


Pantry Makeover to Reduce Stress
BONUS FREEBIE: Want even more ways to stay organized, productive and less stressed? Click here to get access to my List-Making Starter Kit. It will boost your efficiency and get you back to doing more of the things you love.
When my husband and I first bought our apartment six years ago I set everything up so organized and neat.
I was so happy with myself.
But years of living have undone my good planning and created chaos. Plus, I don’t know if I really set it up in the most optimal way to begin with.
Follow the pantry makeover on my Instagram Stories!
One of the things I talk about a lot in my book, Listful Living: A List-Making Journey to a Less Stressed You, is how to reduce stress in your life.
Once you identify what is making you feel stressed you need to remove it from your life. It could be something big like changing a job, finding new friends, or moving to a new town.
But it doesn’t have to be that major.
It could be something as simple as cleaning out your pantry.
In fact – a UCLA study found that when women were surrounded by clutter their stress hormones skyrocketed.
Not only that – it was so annoying to actually find anything. I had so much stuff in there that had either expired, or I had only bought for one recipe and never used again that it was overflowing.
Cleaning out this pantry has been on my to-do since I first started media-training Melissa Coleman from FauxMartha.com for the launch of her book, The Minimalist Kitchen. That was about two years ago…so yeah, I’ve been procrastinating hard on this one.
I took a very systematic approach to not only cleaning out the pantry but setting it up in the perfectly customized way for us.
Beginning to end this process took me about three hours.
I know you’re thinking, “I don’t have three hours!” But listen – I did this over a few days. But you can certainly block off your time however you’d like. I know myself and my productivity style from past projects like this. I always want to tackle it all at once and then end up overwhelmed and tired.
So instead I broke it up into steps:
STEP 1: PLANNING
Time needed – 30 minutes
First I picked a date that I would be clearing out the pantry. I put it on the calendar and then about two weeks before that I started planning.
I re-read Melissa’s chapter on organizing your pantry and started to take notice of the items we really used on a daily basis.
I made a list of the essentials.

Then I thought through what items I wanted in easy-to-reach containers.
I decided that my oatmeal, crackers, pretzels, popcorn, raisins, walnuts and flour definitely needed a spot.
And of course all my spices. But which ones? I had dozens and dozens in there.
Day by day I added to the list and realized that most of what was in that pantry either wasn’t necessary or wasn’t accessible.
They were things I wanted to try or had bought for one recipe but time has proved that I wasn’t going to use them.
STEP 2: CLEARING
Time needed – 60 minutes
This was kind of fun I have to admit. I got out big garbage bags and I timed myself. I started to put all the similar things together and create some order.
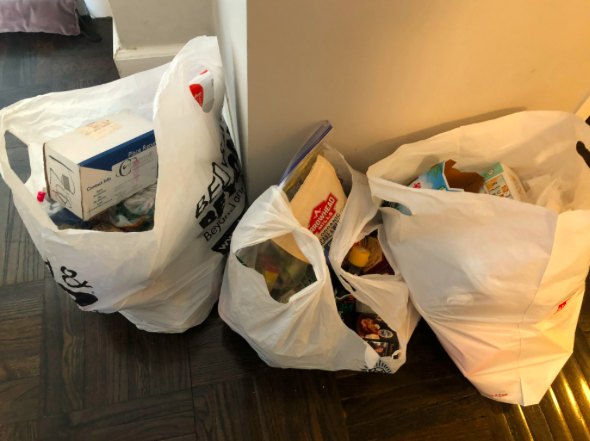
I may or may not have thrown out something that expired in 2015.
I took a similar approach to Marie Kondo’s “Spark Joy” where I held each item and decided what wasn’t going to earn it’s place in that pantry.
Turns out the juicer I got as a gift years ago had to go. I used it a total of three times.
STEP 3: SHOPPING
Time needed – 30 minutes
I love The Container Store and it’s in walking distance to my apartment, so that’s always great slash dangerous.
I’ll admit it can get a little overwhelming if you walk in there without a plan. But since I had already mapped out what I wanted, I had a pretty good idea of what to do.
I bought a bunch of different sized OXO containers, restickable labels, a spice organizer and scoops.
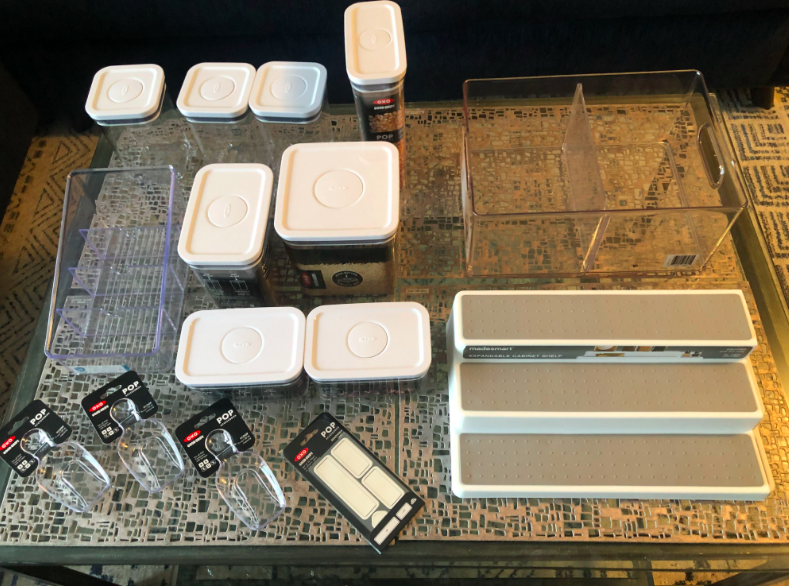
I figured I’d start small and if I needed to get more I could always go back.
STEP 4: REORGANIZING
Time needed – 60 minutes
Once everything came out – I had to put the right things back in.
This pantry was originally designed using Elfa products at The Container Store and they’ve held up great. Despite my overflowing them.
Before I started stuffing things back in the pantry I thought about how we live and what we use most.
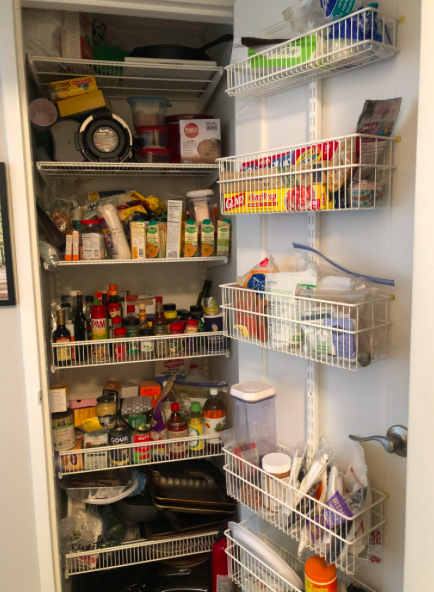
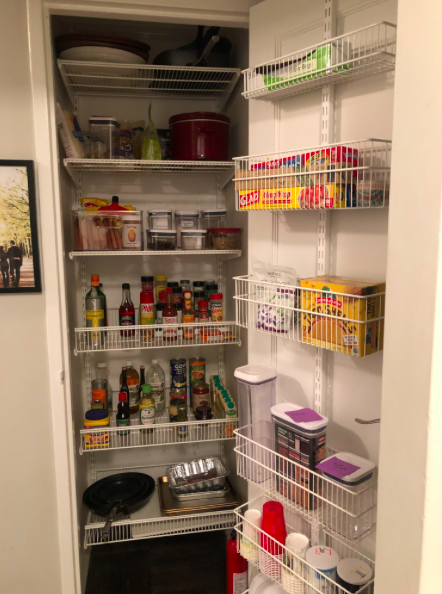
I have six shelves and baskets on the door for extra storage. Here’s how I thought it through:
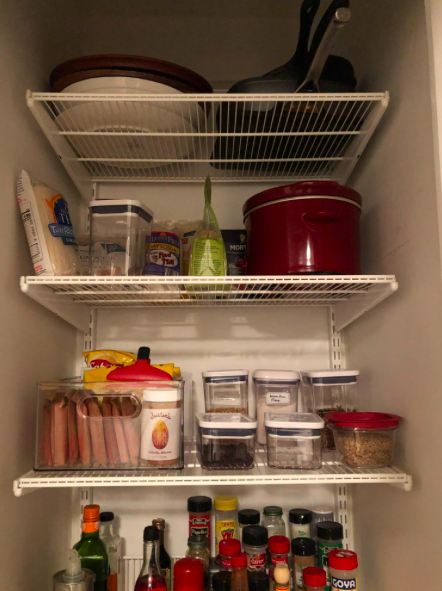
- The First top shelf: Extra pans and serving dishes that don’t fit anywhere else in my apartment.
- Second shelf: Overflow and my crockpot. So this is all the stuff that I’ll buy in bulk and then have there like a staging area when I need to refill one of my OXO containers. But now that I can actually see what’s on that shelf – I won’t buy two bags of gluten free pretzels because I didn’t realize I already had one!
- Third shelf: This is one of the most used shelves. It has my oatmeal (which I eat every day for breakfast by the way), snacks and other essentials that I use all the time like crackers.
- Fourth shelf: This is where all my spices go. The great shelf I bought expands and I can see all the spices I need in one place. No more fumbling around or losing spices. Plus I put all my oil and vinegar here as well.
- Fifth shelf: More oil and vinegar but not what I use everyday. I also put canned and jarred goods here so I can see what I have.
- Sixth shelf: I live in a one-bedroom apartment in New York City. Space is a premium so you use up wherever you have! I’m using this shelf for my frying pans and sheet pans.
I did the same thing with the baskets on the door and filled them with just essentials. No need to over clutter. I’m only filling the space I have.
I talked to my husband about this before I did it and explained my thought process – he agreed and now we both know where everything is supposed to go.
I’m confident we’ll be able to keep this looking and feeling nice because it’s customized just for us. You can do the same thing and make your pantry work for you.
I have to say since doing this – I feel lighter. I’m happy I don’t have to dig through things to get to the one thing I need. I don’t like over buying and now I won’t!
BONUS FREEBIE: Want even more ways to stay organized, productive and less stressed? Click here to get access to my List-Making Starter Kit. It will boost your efficiency and get you back to doing more of the things you love.


Leave a Reply
Want to join the discussion?Feel free to contribute!